Are you worried that your WordPress website may get hacked or prone to hacking? We know a hacked website brings a lot of stress and may harm your business’s reputation. Overall, WordPress is a pretty secure platform. However, if you do not maintain your WordPress well, it is prone to developing security holes, and the chances are that it may get hacked.
Nobody likes a hacked website. After working with hundreds of business owners, we have seen the frustration it brings with it.
With this post, we will share eight actionable tips that you can perform today to secure your website without spending a dime.
Let’s get started!
1. Change the default WordPress admin dashboard URL
- Purpose- Changing the default WordPress admin URL from /wp-admin/ to a custom URL. It will safeguard your website against Brute Force Attacks, Backdoors, Malicious redirects.
- Plugin- Our choice of plugin for changing the admin URL is – WPS Hide.
- Price- Free
- Installation
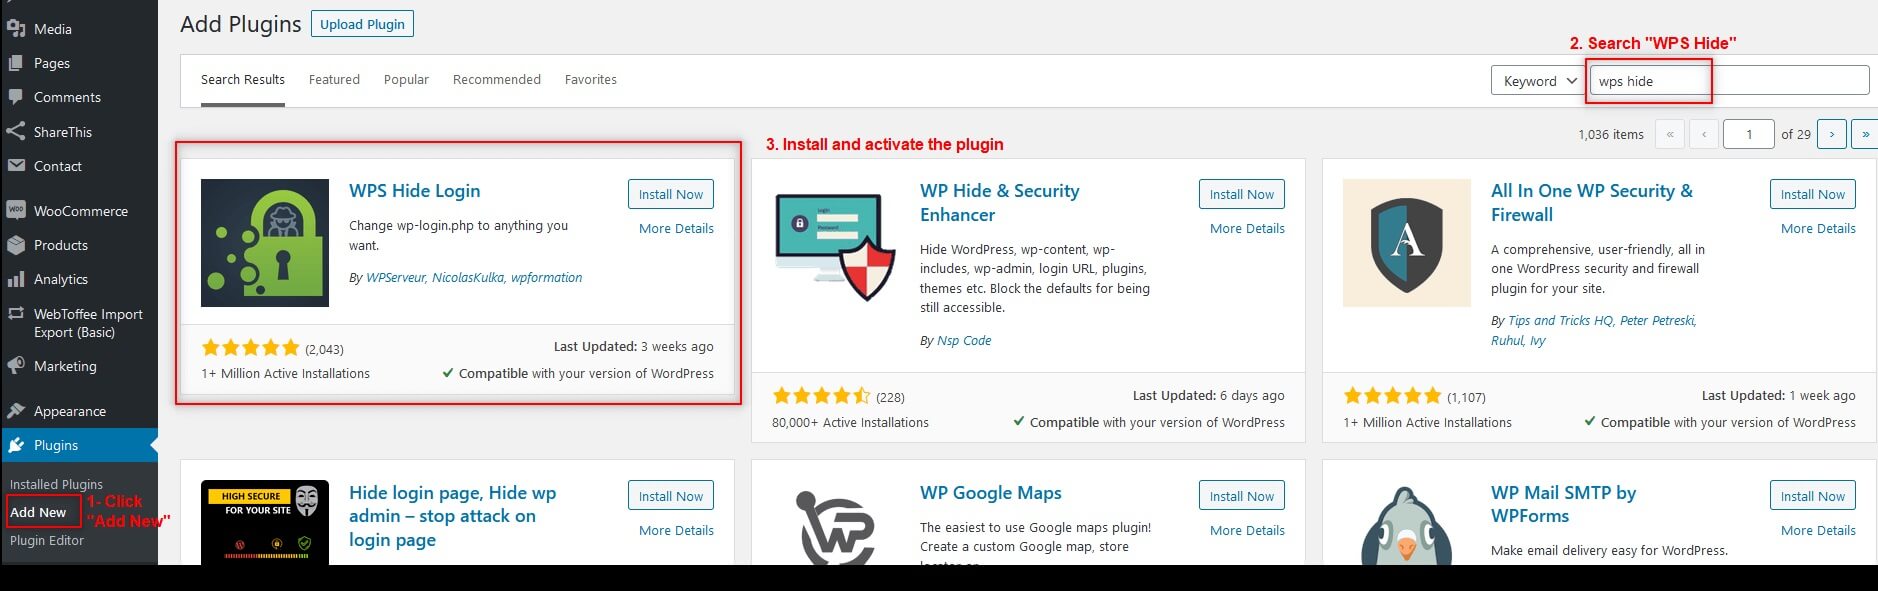
- From the WordPress admin dashboard, select Plugins>Add New.
- Search “WPS Hide” in the search box located in the top right corner.
- Install and activate the WPS Hide login plugin
- Note- Refer to the following screenshot for visual guidance.
- Configure
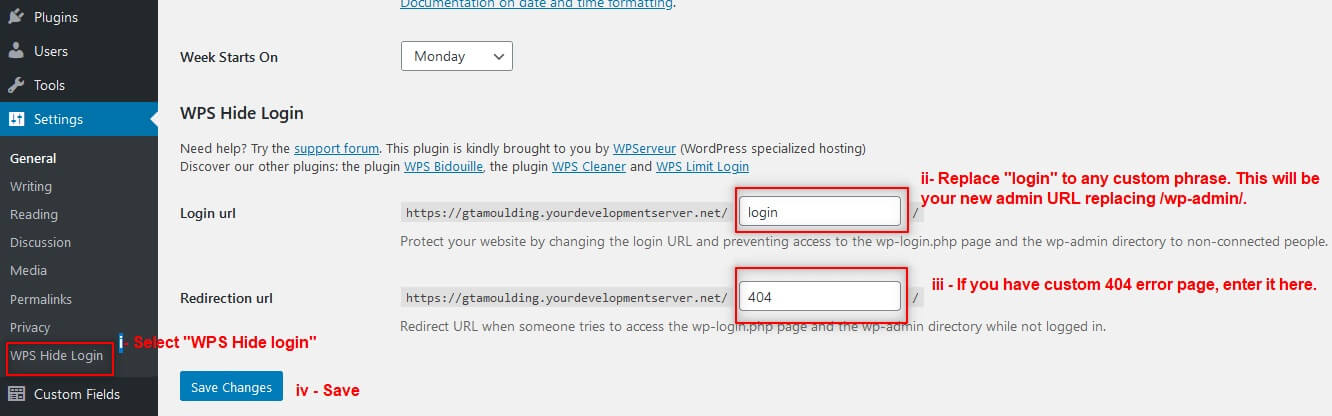
- Go to Settings > WPS Hide Login
- Replace “login” with any custom phrase that is easy for you to remember yet difficult for others to guess. DO NOT use “admin”, “admin panel”, “administrator” etc., as these are prevalent and easy to guess. Make sure to save it securely for your records.
- If you have a custom 404 error page, replace “404” with that page. Leave it unchanged if you don’t have a custom error page or are unsure.
- Save
- Test with your new admin URL to ensure everything is saved correctly. Note- Refer to the following screenshot for visual guidance.
2. Install a Firewall
- Purpose – To add an extra layer of security and create a virtual wall between your website and hackers/spammers. The firewall plugin provides a multitude of protection including- Login security, brute force protection, XML RPC protection, malware scan, reporting weak or outdated plugins, themes, and more. Configure the plugin to automatically block the website from attacks or limit access if a hacking activity is detected.
- Plugin – Our choice of plugin for the Firewall is – WordFence
- Price – Free
- Installation
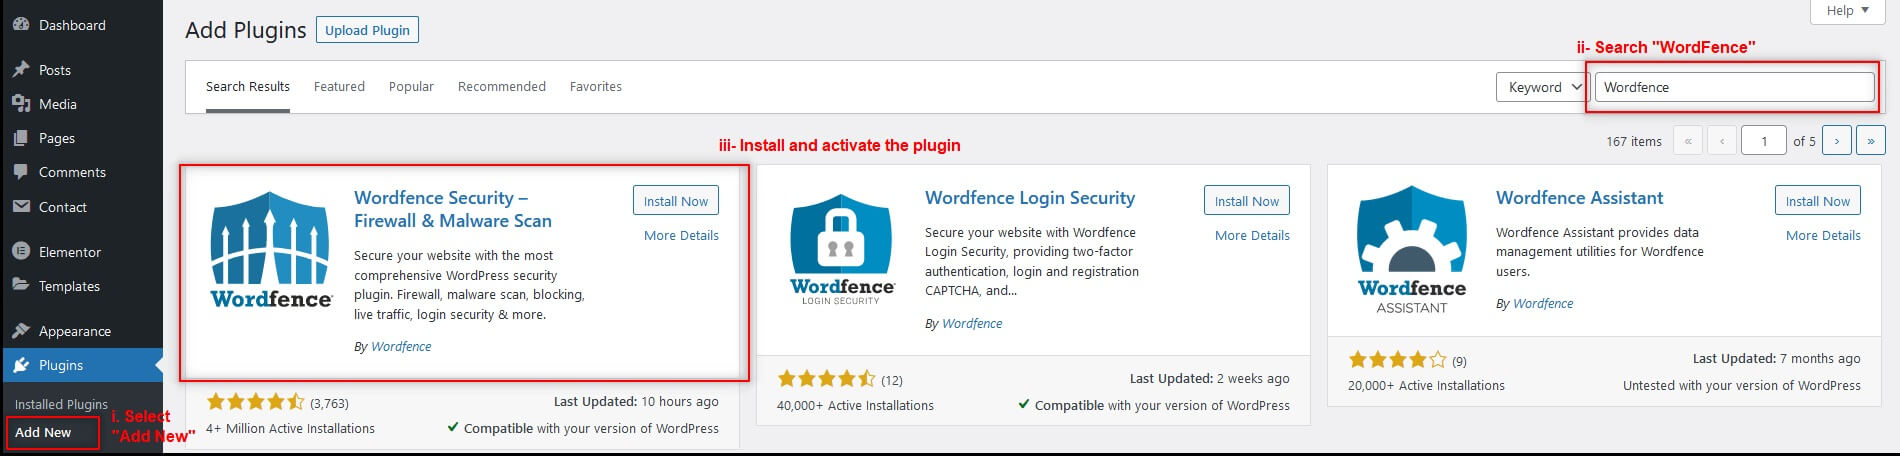
- From the WoArdPress admin dashboard, select Plugins>Add New.
- Search “WordFence” in the search box located in the top right corner.
- Install and activate the WordFence plugin
Note- Refer to the following screenshot for visual guidance.
- Configure
- Select “Wordfence>All Options” from the sidebar.
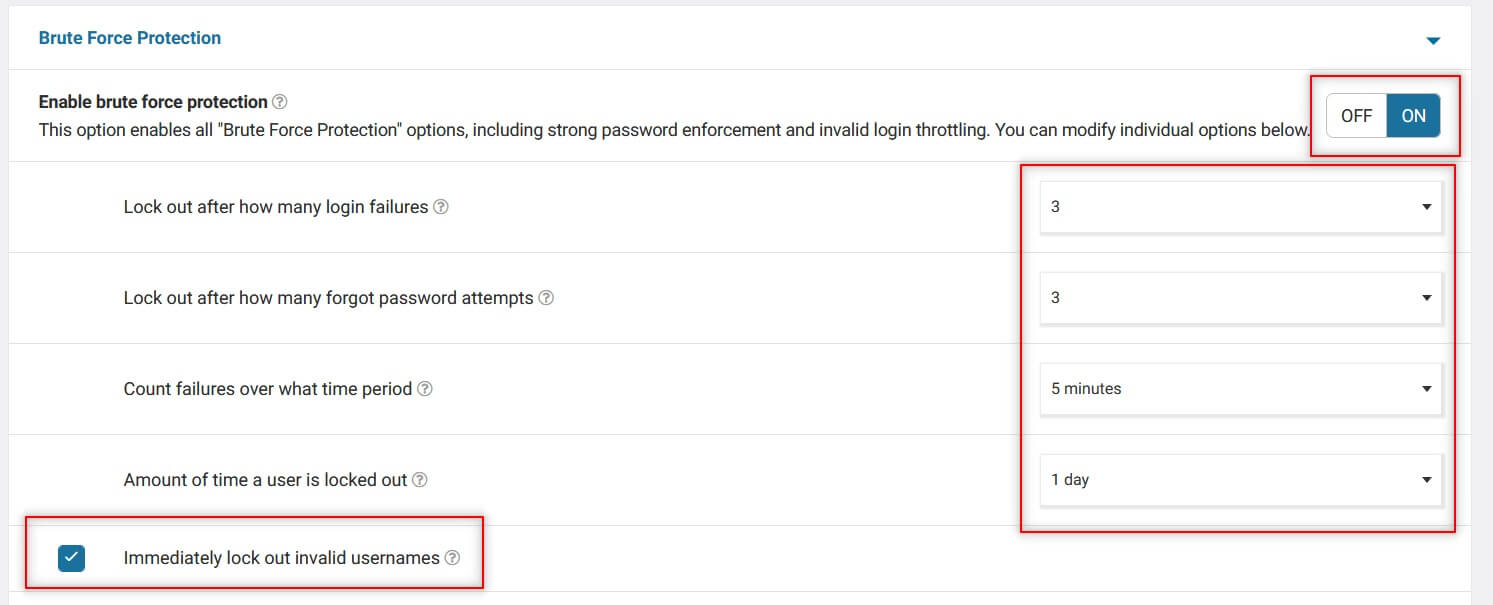
- Enable Brute Force Protection- Enable the protection by clicking the toggle button (refer to the screenshot below). Additionally, set the values for the different parameters as shown in the screenshot below. And don’t forget to tick the “Immediately lock out invalid usernames” setting.
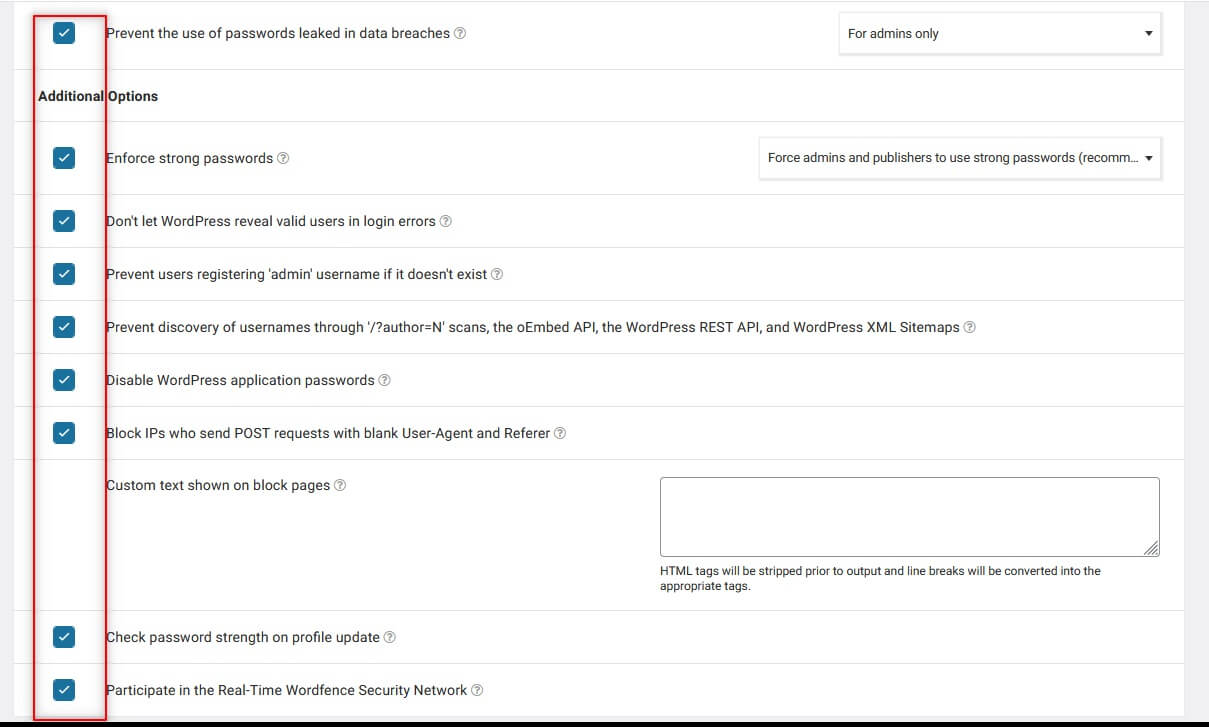
Additionally, there are some options you can enable to further enhance the protection (refer to the screenshot below).
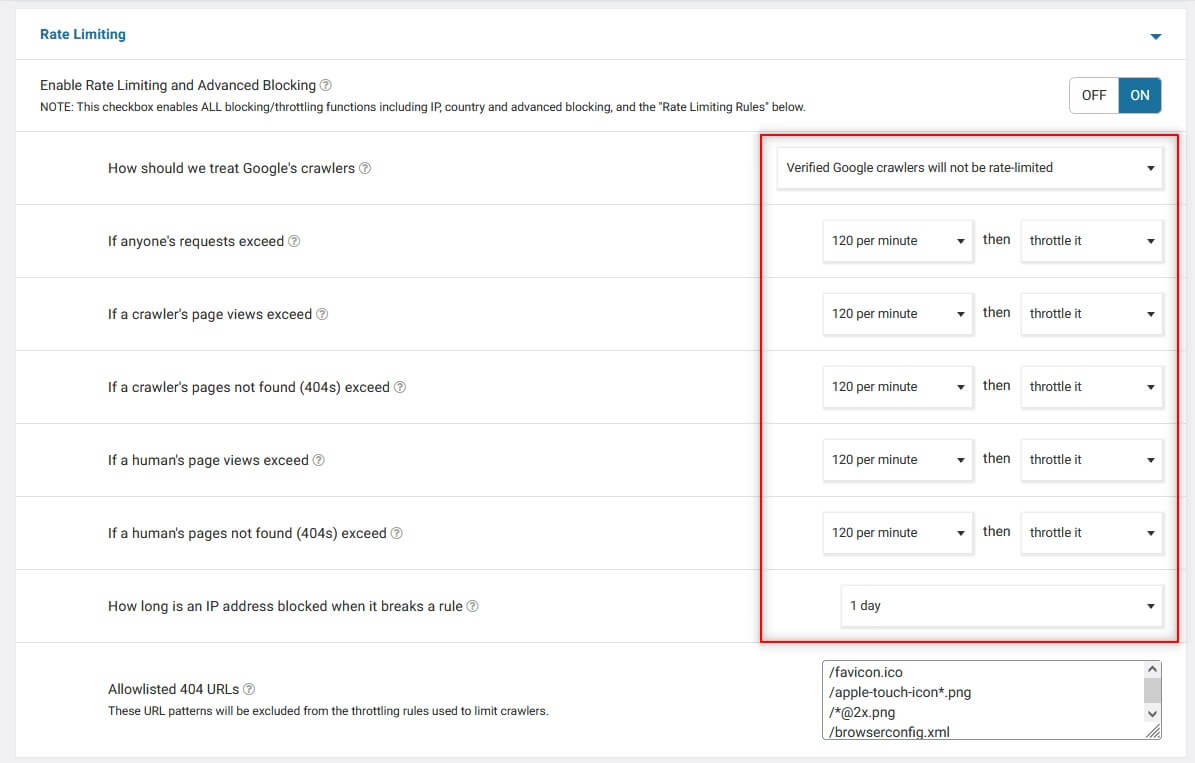
- Rate limiting – This setting will limit access to the website resources if someone is attempting malicious activities to hack or gain access to your website. Refer to the screenshot below and change the values as shown there.
- More settings – Many other settings are already optimized by WordFence. So, we advise you to leave them as it is. However, you can always review them and adjust them as per your requirements.
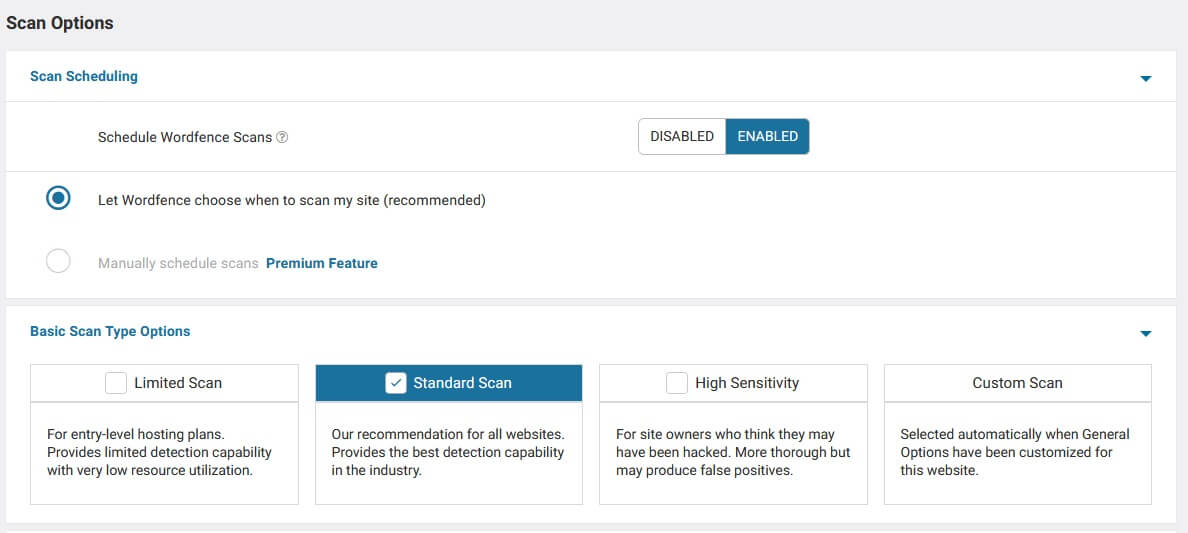
- Scan scheduling – Enable WordFence scan for periodic scanning for any possible issues and go with the recommended setting.
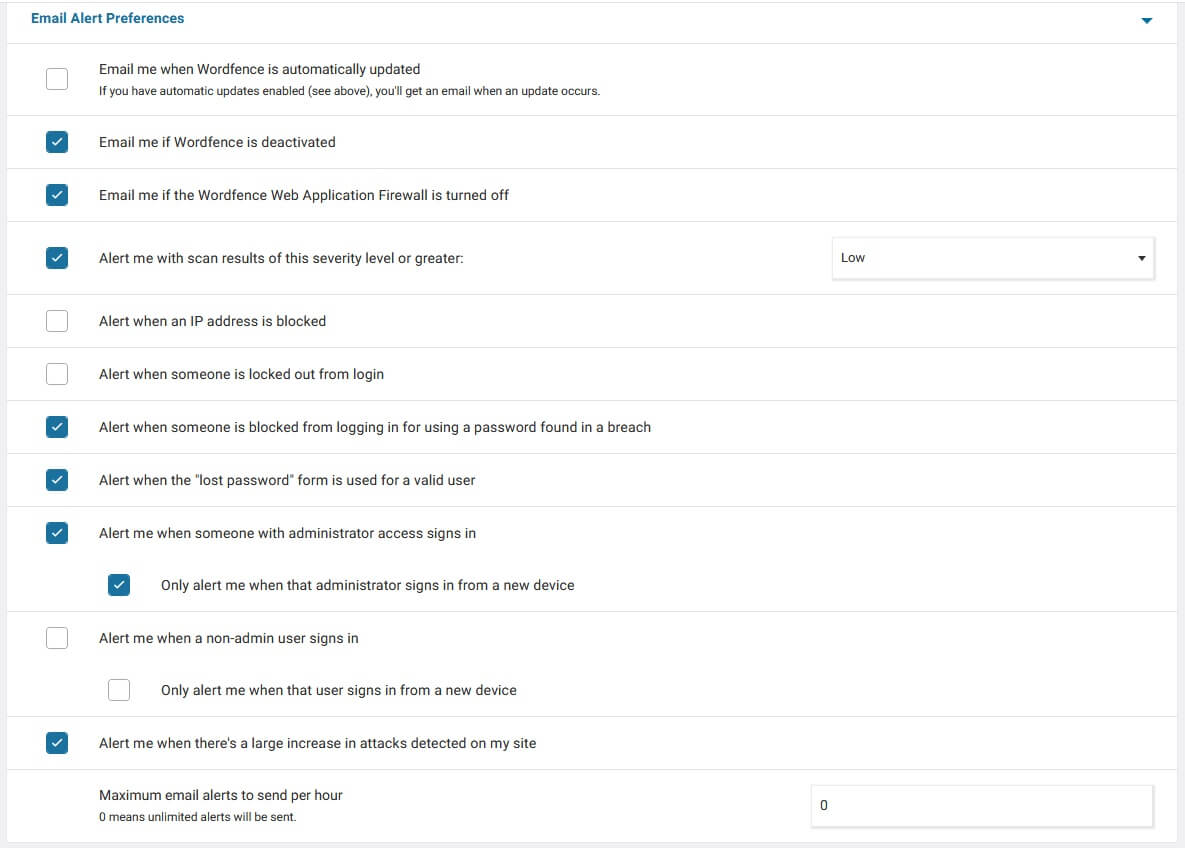
- Email alerts – Lastly, set the email alerts settings to receive notifications if there is any issue on the website. You can adjust the settings as per your preferences. However, our recommended settings are shown in the screenshot below.
- Save – Don’t forget to save your changes.
- Regularly update WordPress core engine, Theme & plugins – This is the number one overlooked aspect for keeping your WordPress website updated. About 80-85% of website owners have no clue that they need to update the plugins, theme, and WordPress core engine until issues start showing up.However, before you start updating your plugins and themes, there are a few things to consider:
- Back up your website – Before embarking on the following updates, we strongly recommend backing up your website files and database. More on how to back up your website is covered below in point number 8.
- Ensure that your website designer adhered to the WordPress Web design best practices during website development. The best practices include:
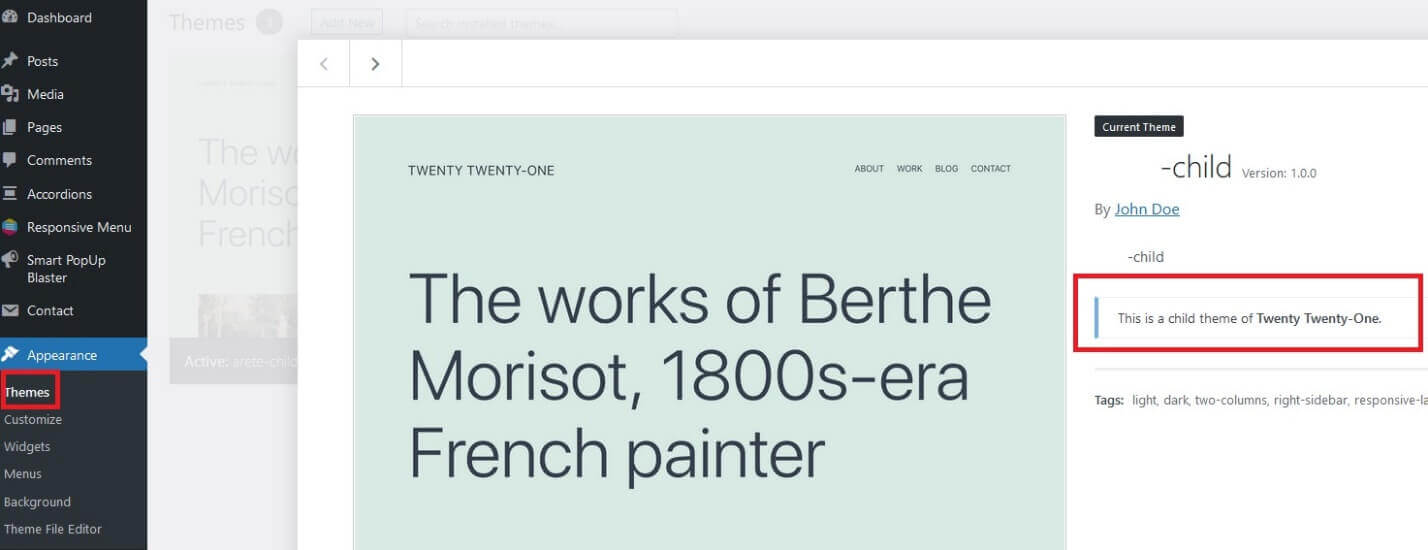
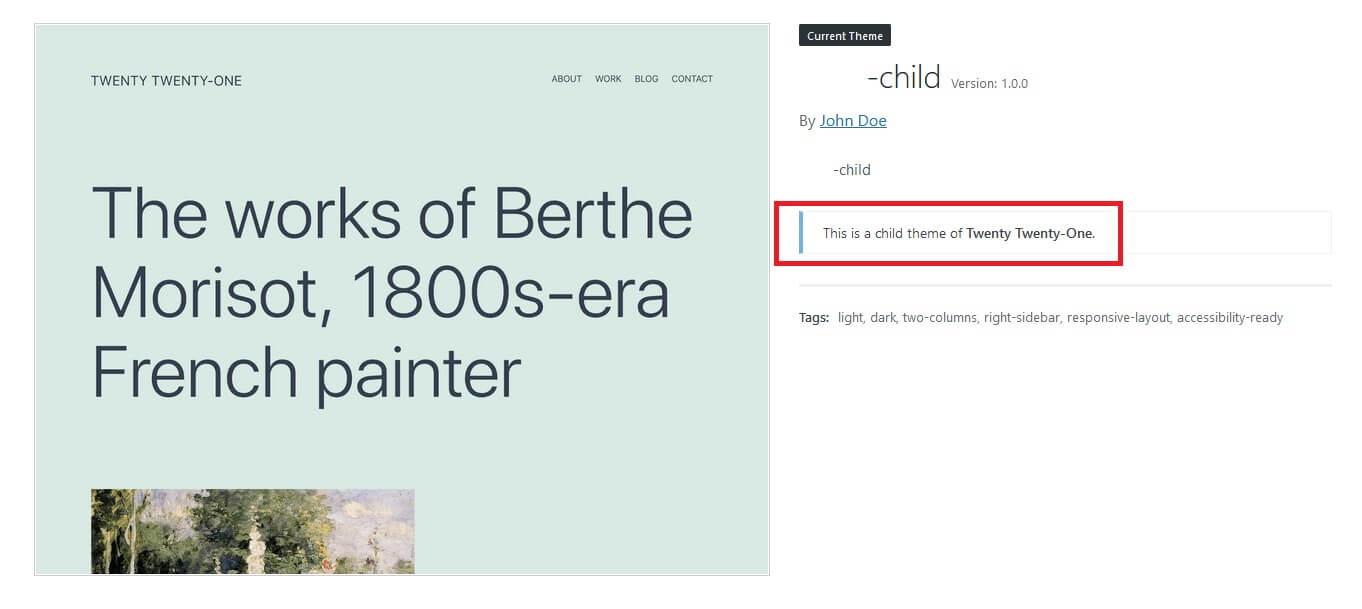
- Create a child theme and add all your design customizations there. To check it, select Appearance>Theme and click the active theme. A pop-up screen like as below should show. If a child theme is present, it would be shown there (refer to the screenshot below).
A word of caution- there are many variables in creating the child theme correctly, and covering every aspect is beyond the scope of this article. You may see that a child theme is present, but it is not a 100% guarantee that updating the theme will not impact the design (if the child theme is not programmed correctly).
We recommend following one of these two options
- Talk to your original web designer to confirm it.
- Hire a professional WordPress maintenance team to examine and confirm.
- Customizing the plugins in the right manner using WordPress Hooks- unfortunately, there is no easy way to test it. We suggest checking with your web designer or hiring a professional WordPress maintenance team to examine and confirm.
- Update your WordPress theme, plugins, and core engine – Once confirmed about the theme and plugin customizations, it’s safe to proceed ahead with updating plugins, theme, and the core engine
- Update plugins
- Updating plugins is straightforward. Select “Plugins>Installed plugins” from the sidebar. It will present the list of all plugins used on the website.
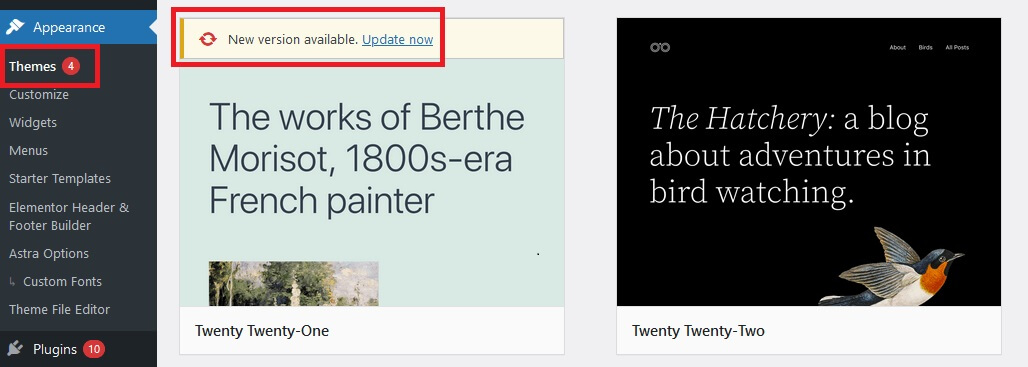
- The plugins for which the update is available will show a notification in yellow color (refer to the screenshot below) with a link to update it. Hit the “Update now” for each plugin where the update is available. When the update is complete, a confirmation message is displayed. So, wait for the confirmation message before starting with the update for the next plugin.

- Update theme
- To update the theme, select “Appearance>Themes” to view the list of themes used.
- If an update is available, a message is displayed – refer to the screenshot below).
- Click “Update now” and the theme will be updated in a few moments.
- Update WordPress core engine
- When updates for the WordPress core engine are available, they will show in the top part of the dashboard (refer to screenshot below).

- Click “Please update now” to update the WordPress core engine. It will redirect to the next screen, where WordPress will present the button to initiate the update process.
- Once completed, a confirmation message will be displayed.
- Test your website- Once all updates are complete, make sure to test your website to ensure everything is working fine.
3. Delete unused themes and inactive plugins
Delete unused themes – With every fresh installation, WordPress has a few default themes packed and installed. Your website requires only one theme (child theme and corresponding parent theme), and others can be deleted. However, it is crucial to determine the correct parent theme before deleting any theme. Otherwise, it can result in the loss of your website or cause serious issues.Determine parent theme for the active child theme:
- Go to Appearance>Themes.
- The first theme on the list is the active theme.
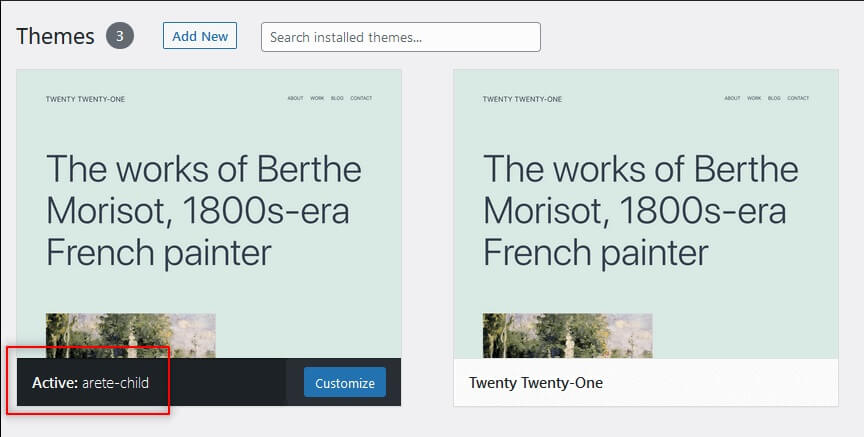
- Click on the theme image for the Active theme to open the details. Refer to the screenshot below, you will be able to determine whether this is a child theme or not and the name of the parent theme when the active theme is a child theme.
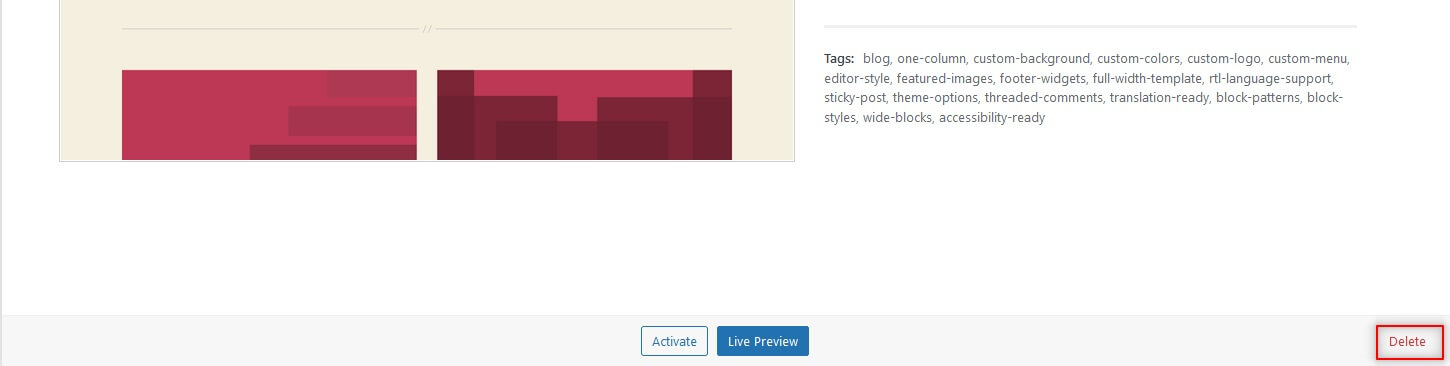
- Deleting extra themes – Click on the theme image and click “Delete” located in the bottom right corner of the pop-up window (refer to the screenshot below). Repeat the above steps for all unused themes.
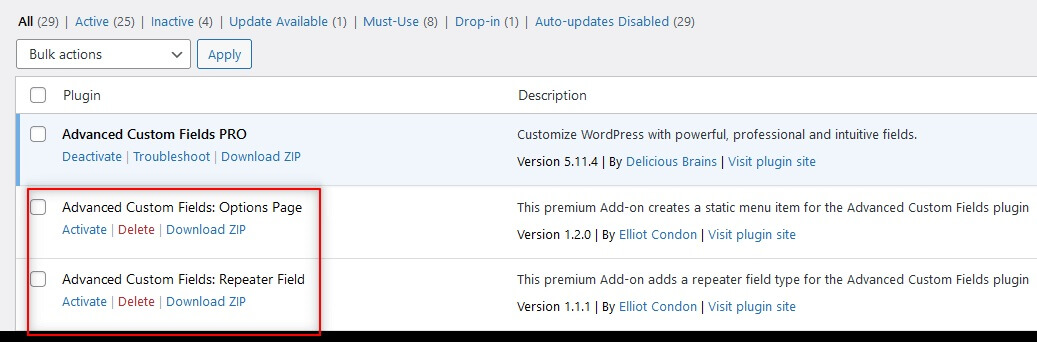
- Delete inactive plugins – As WordPress security best practice, you should delete inactive plugins.
- Go to Plugins > Installed Plugins.
- Any inactive plugins will have a white background to identify easily
- Click “Delete to delete all “Inactive” plugins.
- Test the website- Test your website again to ensure everything is working fine and you have not deleted any active plugin inadvertently.
4. Delete unwanted users, especially administrator-level users–
Over the years, you may work with different designers or developers and need to provide “administrator” level access for them to complete the updates. However, most website owners forget to remove such users. While this may not cause any issue, it is better to delete administrator-level users that are not in use to limit access to the website admin section.
Likewise, if your website has a membership feature, you may like to prune users that are not active or still your customers.
How to delete users
- Select “Users>All users” from the sidebar.
- You can browse through the list of users or filter the user types from the options located at the top.
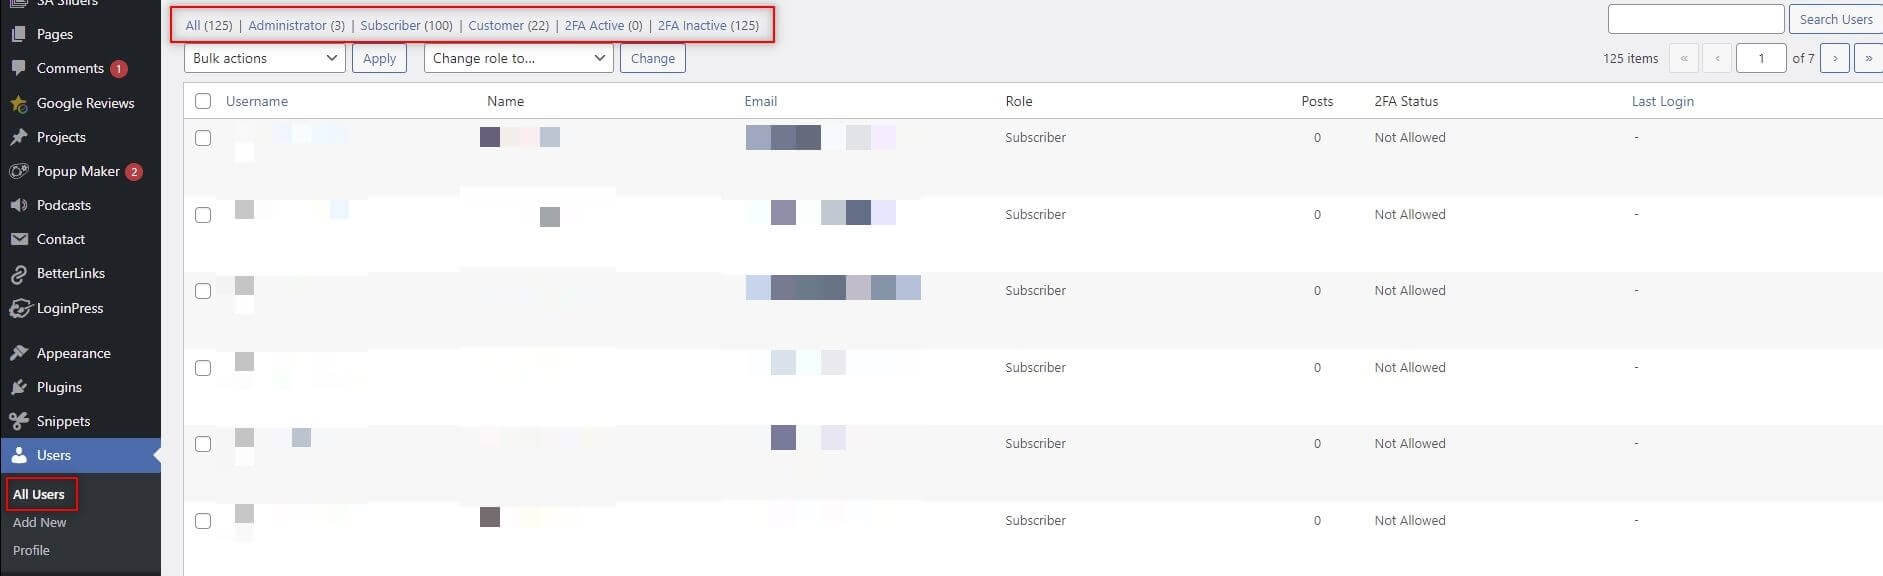
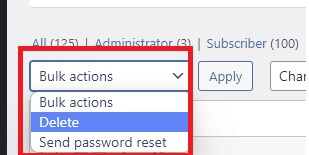
- Click the square box next to the user you want to delete and select an action from the “bulk actions” dropdown.
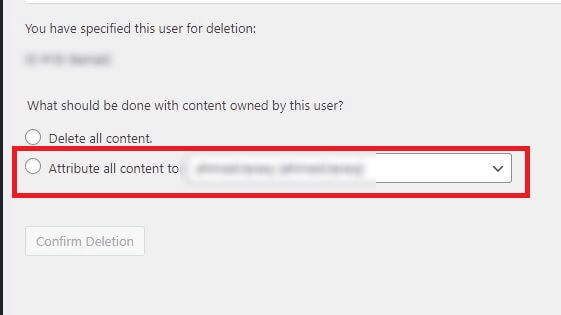
- Attribute the content- On the next screen, make sure to select the appropriate option before confirming the deletion. However, to be safe, choose the “Attribute all content to” option and select yourself or the main admin user for the website.
5. Use reputable themes and plugins from WordPress.Org or other well-known developers-
When selecting theme or plugins for your website, follow the guidelines as below:
Themes
- Avoid free themes – Avoid free themes, if possible, especially the ones that aren’t built by reputed developers. The main reason we suggest against the free theme is because that they are:
- Poorly coded
- Lack useful features
- Offer no support
- Not updated regularly
- May contain malicious code
However, if you would like to use a free theme, check for reviews from other users. It may be good to start with one of the free themes included with the WordPress package or top recommendations from WordPress.
- Premium themes – Based on your project needs, you can select a premium theme that has most of the features that you may need for your website. You can purchase a premium theme from third-party marketplaces such as ThemeForest, TemplateMonster, CreativeMarket, etc.
- Poorly coded
- Lack useful features
- Offer no support
- Not updated regularly
- May contain malicious code
However, if you would like to use a free theme, check for reviews from other users. It may be good to start with one of the free themes included with the WordPress package or top recommendations from WordPress.
Plugins
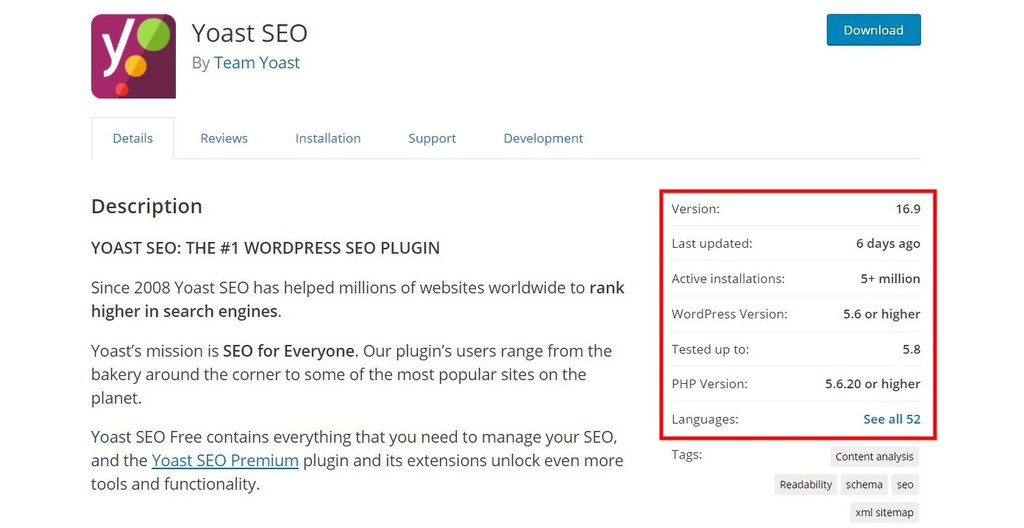
It is important to select good plugins as the consequences of selecting a poor plugin can be huge. Every day thousands of websites are hacked, and the majority of these websites are hacked due to security holes in the plugin(s).To check if the plugin is reputed or not, you can check for the following parameters (refer to the screenshot included before on where to find these details):
- Rating and the number of reviews – higher the rating with reviews from a large number of users, the better it is.
- Active installations – If more and more users are using a plugin, it shows that the plugin is stable. Compare the number of installations for similar plugins to decide the right plugin for your website.
- Compatibility – Make sure to check that the plugin is compatible with the latest WordPress version. If a plugin is not compatible with the latest WordPress version, it might cause errors when integrated with your website.
- Plugin updates – All good plugin developers regularly update their plugins. So, check when the plugin was last updated to decide whether to use it or not. Any plugin that has not been updated in a long time (say six months or so) should be avoided.
6. Back up your website regularly –
As a WordPress website owner, it’s important to plan for backing up your website regularly. A regular backup of the website can save you from a lot of headaches in situations like:
- The website develops some errors.
- The website is broken because of updates.
- The website is hacked.
- Your hosting has expired.
- And so on.
With a recent backup for your website available, you can save valuable time that you may have to spend otherwise troubleshooting or hire a WordPress developer to fix the issues. So, if you have not planned for it, we suggest adding this is as a priority # 1 item on your to-do list.
Back up your WordPress website
There are various methods available when it comes to backing up your WordPress website. However, to keep it easy for you, we would discuss backup with WordPress plugins. There are a few different plugins that you can use for the task:
Our preferred choice of WordPress Backup plugin
We recommend using the Duplicator plugin to back up your website due to ease of use and reliability. We use it for most of our projects to back up the website.
- Installation- Search and install the Duplicator plugin as described in #1 above.
- Price- Free version good for small websites.
- Installation
- From WordPress admin dashboard, select Plugins>Add New.
- Search “Duplicator” in the search box located in the top right corner.
- Install and activate the Duplicator plugin
- Creating back up
- Select “Duplicator>Packages” from the sidebar.
- Select “Create new” in top right corner.

- Follow the wizard to create the backup. If the website files and database size is more than 500 MB, you may get an alert. However, where the website’s file size is large (more than 1GB), you may need to look for the Pro version or use another plugin.
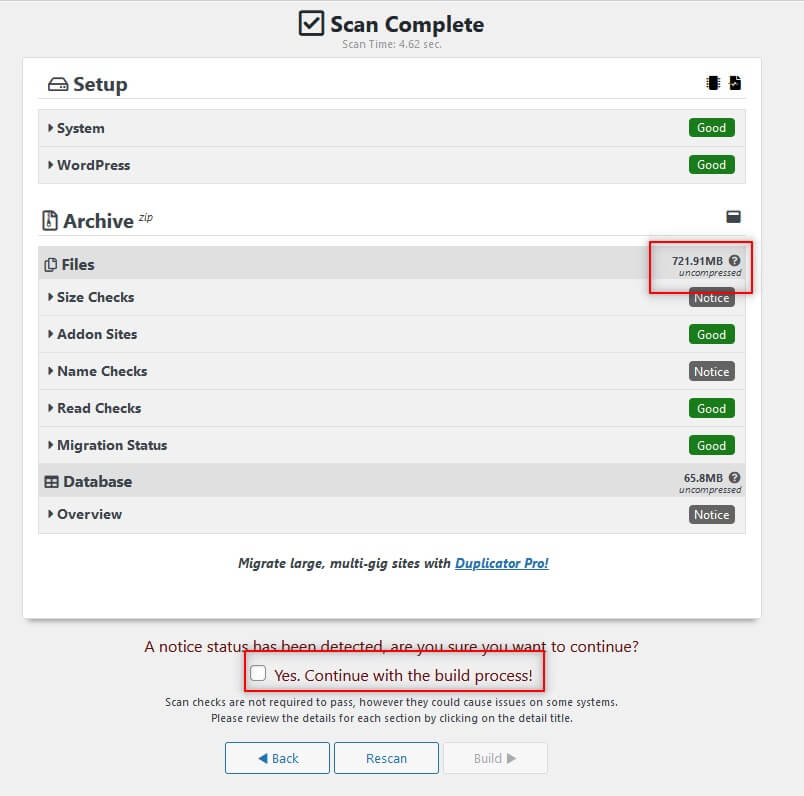
- Once the backup process is complete, you will get the option to download the files. The files will include a zip archive and an installer file. Download and save it securely.

- Installing the website from backup – You can install the website from the backup with the instructions available here.
- We recommend planning for the regular backup of your website after website content updates or after each plugin/theme update.
7. Use a strong admin password –
This is a no-brainer, but still, it is overlooked by countless website owners. Here are some guidelines to choose strong passwords:
- Use a mix of uppercase and lowercase characters.
- Add numbers
- Add special characters such as a question or an exclamation mark, hash sign, etc.
- Use the inbuilt feature of WordPress for generating strong passwords.
Things to avoid when creating a strong password:
- Names- own, kids, or partners
- Name of a favorite movie or sports player
- Combination of name and year for yourself or kids
- Name of your pet
- Common words or number sequences
- Most used words such as admin, administrator, Password, etc.
8. Use secure web hosting –
Choosing the hosting provider for your business is a crucial step. A large chunk of WordPress websites are hacked due to hosting vulnerabilities.
Not all web hosting providers are created equal. You may be tempted to choose the cheapest hosting option, but that may not be a wise decision to make.
When selecting hosting for your business, consider the following factors:
- Is the company well known in the market?
- Check/ask for the security measures for protecting your website?
- Do they offer a backup feature included in the plan?
- Do they offer firewalls at the server level?
Once satisfied with the answers to the above questions, you should proceed with the Right hosting company for your business.
Some hosting companies that we would recommend and use it for our clients.
Feeling secure?
It may seem a lot to improve the security of your WordPress website. We hope that this guide helps you to improve the security of your website and beat the hackers.
Feels overwhelming? Don’t panic. Let our WordPress maintenance experts handle it all for you. Contact us to discuss your project and improve the security of your website.